Play the game here.
What we will be building
We will be making a simple soccer game where you will be able to control a soccer player and push the soccer ball into a net. There will be obstacles in your path that you must dodge. Throughout this process, we will touch on the fundamentals of C# and Unity which include the following.
- Methods
- Variables
- Colliders & Rigidbodies
- Triggers
- If statements
If you haven’t already I suggest following the Install and Basics guide found here.
Game Design
Mechanics
- Move the player forward and backward
- Turn the player left and right
- Push the ball
- Bump into other players
- Know when the ball has scored
- Timer until goal happens
Player Experience
- Fun and Relaxing
Game loop
Until the player scores, we could make multiple levels and make them increasingly harder but for the purposes of the tutorial, we will just make one medium level.
Prerequisite
- Create a 2D unity project, call it Soccer ball pusher
- Add a capsule sprite (our player)
- Create a C# script called SoccerPlayer
- Add the script to your SoccerPlayer
- Rename your SoccerPlayer to have your name
- Download Assets and imporst them into your assets view
Getting Started
If you have completed the prerequisite then you should have something like this.

What are methods?
Our first goal is to get the player moving forward, backward, left, and right. In order to do this, we are first going to discuss what methods are. If you are coming from a functional programming language you may have heard the name function (they are almost the same thing). A method is a group of code that does something, unity has some that they provide you and you can create your own as well. An example of a method might be like, turnOnLight().
Before you can use this method you need to create it like this.
turnOnLight(){
// tell the computer how to turn on the light
}
Don’t worry if you don’t understand, we will get tons of practice making our own. Go ahead and click on the SoccerPlayer script this should open up VS code.
using System.Collections;
using System.Collections.Generic;
using UnityEngine;

public class SoccerPlayer : MonoBehaviour
{
   // Start is called before the first frame update
   void Start()
   {

   }

   // Update is called once per frame
   void Update()
   {

   }
}
This whole component is known as a class which usually represents something, in our case this class represents a soccer player. You may have noticed that unity has provided us with some default methods Start() and Update() will come back to these. As you can imagine much like real-life soccer players can do things like run, shoot, drink water these would all be methods that describe what the player can do. We only need to write methods for actions we care about, so we aren’t going to write a method to drink water even tho we could.
Back to the Start() and Update() methods. The Start() method only gets called once this is when the game first loads up. The Update() method is called in a loop, you can imagine it’s on a timed interval let’s say 10 seconds, so every 10 seconds the game would say execute Update(), 10 seconds later Update(). In reality, the update interval is configurable and 10 seconds would be way too long to wait for updates. Let’s dive in a little deeper.
As you have seen in the previous tutorial we could add a Debug.Log(“Hellow world”) to our Start() method and every time we would click the play button it would print out Hello world to the console. What would happen if we added this to the Update() method?

It prints Hello world repeatedly.
How do we move the player in the editor?
Let’s hop back into unity and see how we can move our player.

Try increasing/decreasing the position, scale, and rotation and observe what happens.
By increasing the x,y position it looks like the player is moving front to back. But it doesn’t seem like z is doing anything, why is that? Well, unity actually operates in a 3D space so if you were to hit the 2D button you would actually see the player move along the blue arrow but looking down on this you wouldn’t notice a change.

If you change the z on the rotation it looks like it turns left/right but if you rotate x,y it looks like the object gets skinnier, that’s because we would only be able to see some of the sides. It’s kind of like a piece of paper Mario when he spins, you can barely see him because he isn’t thick.
How do we move the player with code?
We know that we need to be able to manipulate the position and rotation but how do we connect that to our code? We can do this by accessing the transform.Rotate() method. This method takes in 3 arguments the x,y,z just like the editor. The only difference is that it expects something called a float (numbers that include decimals like 1.122 or 1.0). You can see the parameter types from the method definition by command + clicking on the method.
       // Summary:
       //     The implementation of this method applies a rotation of zAngle degrees around
       //     the z axis, xAngle degrees around the x axis, and yAngle degrees around the y
       //     axis (in that order).
       //
       // Parameters:
       //   xAngle:
       //     Degrees to rotate the GameObject around the X axis.
       //
       //   yAngle:
       //     Degrees to rotate the GameObject around the Y axis.
       //
       //   zAngle:
       //     Degrees to rotate the GameObject around the Z axis.
       public void Rotate(float xAngle, float yAngle, float zAngle);
So that means if we want to call it we do something like this:
   // Update is called once per frame
   void Update()
  {
      transform.Rotate(0,0,20);
      // Or for decimal numbers like this:
      // transform.Rotate(0,0,0.1f);
  }
Go back to unity click run observe what happens. Then comment out the first one and uncommenting the second one like this:
void Update()
  {
   //    transform.Rotate(0,0,20);
      // Or for decimal numbers like this:
      transform.Rotate(0,0,0.1f);
  }
Run again, what did you notice? The player spins a lot faster or a lot slower depending on the size of that number. Much like the transform.Rotate() we have the transform.Translate() method to manipulate the position.
Challenge time
Attempt to make the player move forward from the code.
If you have something like this the player will run right off the screen. If you uncomment the other line our player will run in circles.
// Update is called once per frame
   void Update()
  {
      transform.Translate(0,0.1f,0);
   //    transform.Rotate(0,0,10);
  }
How do we change the speed and direction of the player through keys?
In our previous challenge, we managed to get our player to go left/right and backward/forward by hard coding the numbers in the methods. This is not very user-friendly so we should allow those numbers to change based on some user input. This can be accomplished through variables.
What are variables?
Variables store information, they each have a name, type, and information. Some common variables are:
| Type | Name | Info | Code Example |
| int | age | 24 | int age = 24; |
| float | money | 10.62 | float money = 10.62f; |
| String | str | Hello world | String str = “Hello world”; |
| boolean | var4 | true | bool var4 = true; |
We are going to create a variable for our players turning speed. You would do it like this.
public class SoccerPlayer : MonoBehaviour
{

   float turningSpeed = 10;

   // Start is called before the first frame update
   void Start()
   {

   }

   // Update is called once per frame
   void Update()
  {
      transform.Translate(0,0.1f,0);
      transform.Rotate(0,0,turningSpeed);
  }

}
Challenge time
Create a second variable to control the runningSpeed.
public class SoccerPlayer : MonoBehaviour
{

   float turningSpeed = 10;
   float runningSpeed = 0.1f;

   // Start is called before the first frame update
   void Start()
   {

   }

   // Update is called once per frame
   void Update()
  {
      transform.Translate(0,runningSpeed,0);
      transform.Rotate(0,0,turningSpeed);
  }

}
Now we need to be able to get input from the user’s keyboard. This is done through a input system, inputs systems can be anything from keyboards, mice, cameras, microphones anything that takes data in. We can do this by opening Edit > Project Setting > Input Manager > Axes > Horizontal and Edit > Project Setting > Input Manager > Axes > Vertical

To access these inputs from inside the code we can do it like this:
public class SoccerPlayer : MonoBehaviour
{

   float turningSpeed = 10;
   float runningSpeed = 0.1f;

   // Start is called before the first frame update
   void Start()
   {

   }

   // Update is called once per frame
   void Update()
  {
      float turnAmount = Input.GetAxis("Horizontal");
      transform.Translate(0,runningSpeed,0);
      transform.Rotate(0,0,turningSpeed * turnAmount);
  }

}
Nice, now when we hit play we can change the players direction with the arrow keys but the player is constantly moving forward. You might be wondering why we declared the turnAmount variable in the Update() method, that’s because we want to be constantly updating this variable based on whether the user is holding the key down or not whereas the turningSpeed is constant and doesn’t need updating. Another thing you might have noticed is that the direction turns the player in the opposite direction than what we tell it to do. One option is to reverse the negative/positive buttons in the Edit > Project Setting > Input Manager > Axes > Horizontal like this:

Or the other alternative is to leave it the way it was and multiply it by -1, this will inverse the operation.
Challenge time
Create an input system for runningAmount.
void Update()
  {
      float turnAmount = Input.GetAxis("Horizontal");
      float runningAmount = Input.GetAxis("Vertical");
      transform.Translate(0,runningSpeed * runningAmount,0);
      transform.Rotate(0,0,turningSpeed * turnAmount);
  }
Congratulations you should be able to run around with the player like this:

Currently, our code will not run the same on a fast computer as it will a slow computer because the Update() method will get called more frequently on a fast one than on a slow one. To fix this we need to multiply our runningAmount and turningAmount by a special variable provided by unity called Time.deltaTime. It will look like this:
   void Update()
  {
      float turnAmount = Input.GetAxis("Horizontal") * Time.deltaTime;
      float runningAmount = Input.GetAxis("Vertical") * Time.deltaTime;
      transform.Translate(0,runningSpeed * runningAmount,0);
      transform.Rotate(0,0,turningSpeed * turnAmount);
  }
What are Colliders & Rigidbodies
Colliders: A force field around a non-moving object
Rigidbodies: Should be attached to objects that move
If we add a new sprite to our game and drive into it you will notice that we just drive over it, there is no sense of a collision. We can fix that by adding a new sprite and attaching a collider to both the player and the new sprite. Let’s add a circle sprite and pretend its the soccer ball. Then Select the soccer ball > Inspector > Add component > Circle Collider 2D
Then do the same for the soccer player but this time Select the player > Inspector > Add component > Capsule Collider 2D
These two components are useful but not if we want to see an opposing force, we need to also apply rigidbodies. Rigidbodies tell unity to apply physics to moving objects. Go ahead and apply rigidbodies to both the soccer ball and player like this:
Select the player > Inspector > Add component > Rigidbody 2D
Select the soccer ball > Inspector > Add component > Rigidbody 2D
Now press play and run into the soccer ball. Notice how the objects fall off the screen, this is because the physics engine is applying gravity sense we do not care about gravity in this game lets disable it for each object by Selecting the object > Inspector > Rigidbody 2D > Gravity Scale = 0
If you find it too difficult to push the ball try changing your collider on the player to a box collider 2D.
Great now you have the ability to push the ball around the screen with your arrow keys.
What are Triggers?
Triggers: they are essentially colliders that don’t apply physics. For example, we want to allow objects to pass through but we still want to know when they cross paths.
We are going to use a trigger to let us know when the ball passes the goal line. Create another sprite image and attach a collider to it. In order to make this a trigger we need to select the sprite Inspector > Box Collider 2D > Is Trigger

Challenge Time
using System.Collections;
using System.Collections.Generic;
using Unity.VisualScripting;
using UnityEngine;

public class Net : MonoBehaviour
{
   void OnTriggerEnter2D(){
       Debug.Log("Something ran into me!");
   }
}

Challenge Time
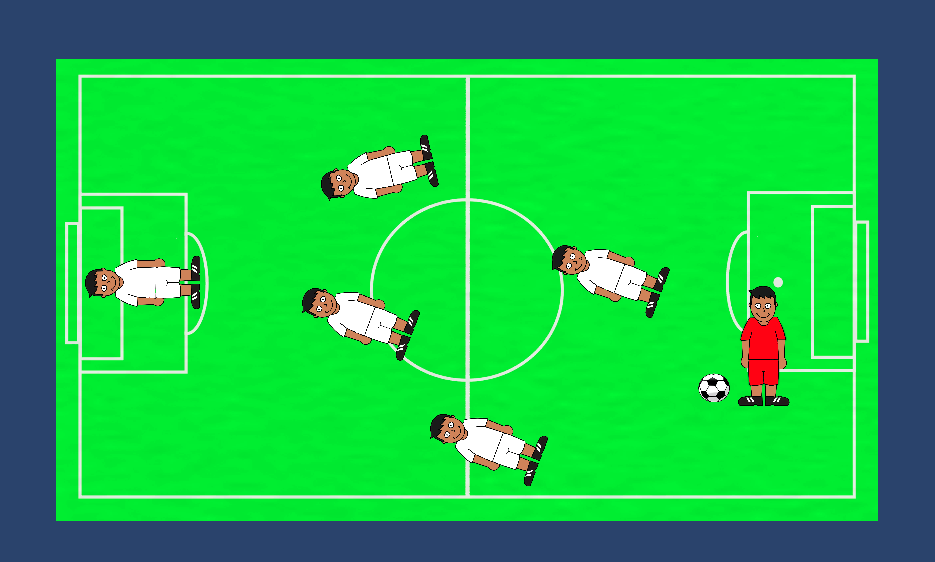
Now that we have most of the functionality figured out, create a new level for our game.
- Add multiple players with collisions and rigidbodies
- Scale them so they make sense
- Add a trigger where you think the goal line should be
Hints:
- Select Object > Inspector > Sprite Render > Additional Setting > Order in Layer Where lower numbers on the bottom higher numbers on top.
- If the camera isn’t showing everything try scaling so its view is of everything

- 5 defensive players all with polygon collider 2D
- 1 ball with circle collider and rigid body, 0 gravity
- 1 offensive player, collider, rigidbody
- 1 net as a trigger
What are if statements?
If statements are very useful statements that allow us to select a path of the code based on a particular condition. For example, if the ball enters the net then it’s a goal. Let’s add some logic to tell the user when they score. Currently when either the ball or the player enters the net our trigger prints something hit me. What if we only want to print this message if the ball goes in the net? We should use an if statement to tell us if it was the ball.
The first step is to tag our player and ball so that we can distinguish the difference in our code. Select the ball > Inspector > Tag > Add Tag

Select the + icon then enter a tag I called mine ball, then hit save.

Note that this tag still hasn’t been applied to the ball yet, Select the ball > Inspector > Tag > ball
Now that your game object is tagged we can conditionally print you scored when the ball enters the net like this
using System.Collections;
using System.Collections.Generic;
using Unity.VisualScripting;
using UnityEngine;

public class Net : MonoBehaviour
{
   void OnTriggerEnter2D(Collider2D other){
       if (other.tag == "ball"){
           Debug.Log("You Scored!");
       }
   }
}
In this example, the parameter that’s passed in is the gameObject that enters the trigger, so when the ball goes in the net this method is called and passes in the collider the ball object prints you scored but the player object is ignored.
Final touches
Debug.Log is great when you are playing in the Unity Editor but it’s no good for a real game, let’s display some text that you scored.
using System.Collections;
using System.Collections.Generic;
using Unity.VisualScripting;
using UnityEngine;

public class Net : MonoBehaviour
{
   GameObject text;

   void Start(){
      text = GameObject.Find("Goal");
      text.SetActive(false);
   }

   void OnTriggerEnter2D(Collider2D other){
       if (other.tag == "ball"){
           Debug.Log("Goal");
           text.SetActive(true);
       }
   }
}
Pingback: Dirt biker – MacroSlice
Pingback: TakeIt or LeaveIt – MacroSlice