What we will be building
Play here.
We will be making a game I like to call TakeIt or LeaveIt. There are 10 rounds each round the user selects fewer and fewer cases until they are left with the prize money inside the final case. Between each round, the game show host sends out an offer to the player, the player has the choice to TakeIt or LeaveIt. The goal of the game is to win as much money as possible, Good Luck and happy playing.
What will we be learning:
- UI Canvas, TextMeshPro, Buttons
- Scriptable Objects
- Finding Objects
If you haven’t already I suggest following this series from the beginning.
Game Design
Mechanics
- Mechanism to store money options
- Buttons to select briefcases
- Offer calculator to temp users into taking the deal (TakeIt).
- A way to replay the game
Player Experience
- Suspenseful and Excited
Game loop
Until the player runs out of cases to choose from or they accept the offer from the game show host.
Prerequisite
- Create a 2D unity project, call it TakeIt or LeaveIt
- Download and import the game assets into your assets window.
Getting Started
User interface (UI) is the part of our applications users can see, touch, and interact with. UI elements contain things like images, buttons, text, etc… Every UI element must be contained in a Canvas. Fun fact, if you created a UI element by Hierarchy > right-click > UI > Image it will automatically add that element as a child of a Canvas object. The child of an object just means that it lives underneath another in the Hierarchy view.

UI Canvas, TextMeshPro, Buttons
Go ahead and add an image element. Something you might notice is that the image isnt really a scene, this issue is that by default we are looking at the camera view. The camera view captures something called the real world. UI elements are captured in the scene view and can be seen if you zoom out a lot further.
World space —-> Screen space


For this tutorial we are only interested in screen space so zoom that MF***** out!
Let me show you a cool trick on manipulating UI elements. First, select the image element we just created then in the inspector view you will see crosshairs of a scope, click that. Then you will see an editor pop open like this:

Hold down Alt on your keyboard and click options in the editor, you be able to see the image hop all around. The super useful one for background images is the one that stretches it out across the whole view. Then drag the stage image from the downloaded assets to the Inspector > Image > Source Image, it should look like this.

Now that we have a stage, were going to want to give people some instructions on how to play the game. We can add a banner at the top. Add a new image as a child to the background image and place it near the top, rename this image to instructions. Then as a child to the instructions in the Hierarchy > Instructions > righ-click > UI > Text – TextMeshPro

I changed the default color of my image! You may be asked to import an asset for TextMeshPro just accept that. Select the Text object in the Hierarchy > Canvas > Instructions > Text (TMP) then look in the Inspector > TextMeshPro

Update the text to say something like CHOOSE A CASE then feel free to make the text alignment, size, style match with whatever makes you happy 🙂
We really could have used a button for the instructions panel, but that’s okay because we didn’t know about them. Let’s use a button to show the available options left for the user to select.
- Create Empty game object call it LeftOptions
- Move the LeftOptions so that its a sibling of the instructions and child of Background
- Add a Vertical Layout Group component to LeftOptions
- Add a button to LeftOptions and name it to option
- Stretch the button to take up the length of the screen
Notice how the button automatically comes with a child of text attached.

Very nice! We need to configure this button to meet our needs let’s head over to the Inspector after selecting the newly created button.

Finally, we just need to duplicate that option multiple time, 13 to be exact!

Then all we need to do to get to the right side is duplicate the LeftOption, move to the right side, and rename it to RightOpiton. I’m also going to refactor the objects to have a common empty game object just called options for logical groupings.

Challenge Time
Add 26 briefCases to look like the following image


Hints:
- Buttons have a source image that can be selected
- Instead of Vertical Layout Groupings, try Horizontal
Scriptable Objects
Sometimes we want to be able to store data without attaching a script to an Empty GameObject, that’s where scriptable objects come in hand. Like most scripts that we have created up to this point lets Project > Assets > Script(Create Folder) > right-click > Create > C# Script. In the following picture take note of the specific parts called out.
using System;
using System.Collections;
using System.Collections.Generic;
using Unity.VisualScripting;
using UnityEngine;

[CreateAssetMenu(menuName = "Option", fileName = "Option")]//Adds to unity create menu
public class OptionSO : ScriptableObject //Instead of MonoBehaviour
{
   [SerializeField]float price;
   bool hasBeenScene;

  public void SetHasBeenScene(bool state){
       hasBeenScene = state;
   }

   public bool GetHasBeenScene(){
       return hasBeenScene;
   }

   public float GetPrice(){
       return price;
   }
   public String GetPriceText(){
       return price.ToString();
   }
}
To Create the new scriptable object Project > Assets > OptionsSO(Create folder) > right click > Create > Option (if you copied the code above this name comes from the Header set)
[CreateAssetMenu(menuName = "Option", fileName = "Option")]
Challenge Time
Copy the code provided and create 26 Scriptable Objects (Options) and set the prices of each in the following order.
- 0.01
- 1
- 5
- 10
- 25
- 50
- 75
- 100
- 200
- 300
- 400
- 500
- 750
- 1000
- 5000
- 10000
- 25000
- 50000
- 75000
- 100000
- 200000
- 300000
- 400000
- 500000
- 750000
- 1000000

Finding Objects
Notice how all the options and cases show the default values assigned at creation. We should use code to update the text on these buttons. The first thing we need to do is find these objects. I’ve decided to create a Script called Main.cs and attach it to the MainCanvas, where the script is attached is imported.
Unity provides some methods that are useful in finding objects we are interested in.
GetComponent() // If we were to call from the MainCanvas it would return the MainCanvasGetComponentsInChildren<Button>() // This would return all the children of MainCanvas that are buttons in an array, in our case it would get the options and case buttonsWhat if we wanted to capture the options in one array and cases in another. As the saying goes there are multiple ways to skin a cat, although I am showing this approach I’m sure there are 100’s of ways.
I created a two SerializedField
[SerializeField] GameObject casesObj;
Button[] casesButtons;

[SerializeField] GameObject optionsObj;
Button[] optionButtons;
And then to find the buttons of each you can call it like this
void Awake() {
       casesButtons = casesObj.GetComponentsInChildren<Button>();
       optionButtons = optionsObj.GetComponentsInChildren<Button>();
   }
Finally, to update the text I created two method
   void UpdateCases(){
       for(int i = 0; i < casesButtons.Length; i++){
           TextMeshProUGUI caseText = casesButtons[i].GetComponentInChildren<TextMeshProUGUI>();
           caseText.text = (i + 1).ToString();
       }
   }

   void UpdateOptions(){
       for(int i = 0; i < casesButtons.Length; i++){
           TextMeshProUGUI optionText = optionButtons[i].GetComponentInChildren<TextMeshProUGUI>();
           OptionSO option = options.ElementAt<OptionSO>(i);
           option.SetHasBeenScene(false);
           optionText.text = option.GetPriceText();
       }
   }
And call them in the start method
void Start() {
  UpdateCases();
  UpdateOptions();
}
Finally, we just need to select the serialized fields in unity press play and we should see the cases and options labeled correctly.

Looks good, but we still can’t interact with a case. We would want something to happen when we click the case. The first option that’s available is to create a function in the main.cs and then we can append to the button through the UI by selecting 1 particular case and looking in the Inspector > Button > On Click ().
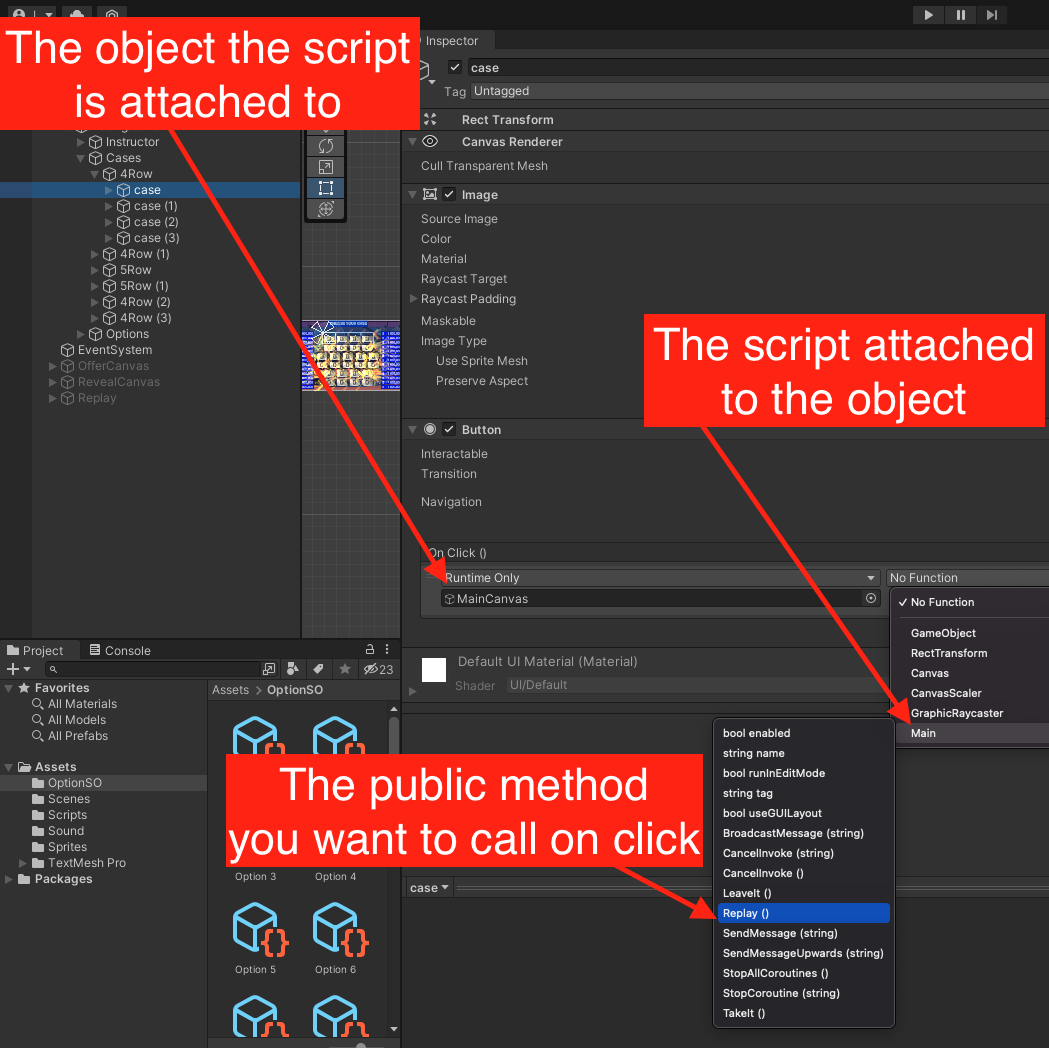
But this can be a lot of work to manually set up each time, instead, we are going to add this method with code. Instead, our UpdateCase method can add a listener to our button which is essentially doing the same thing.
  void UpdateCases(){
       for(int i = 0; i < casesButtons.Length; i++){
           TextMeshProUGUI caseText =       casesButtons[i].GetComponentInChildren<TextMeshProUGUI>();
           caseText.text = (i + 1).ToString();
    int tmp = i;
           casesButtons[i].onClick.AddListener(() => CaseSelected(tmp));
       }
   }
We will also need to implement that CaseSelected(int index) method.
   void CaseSelected(int index){
       if(!hasChoosenFirstCase){
           Image buttonImage = casesButtons[index].GetComponentInChildren<Image>();
           buttonImage.color = new Color32(255,240,0,255);
           hasChoosenFirstCase = true;
           SetInstructions();
       } else {
           // Assign random option value to case
           // Show case selected
           // Remove the case selected
	    // If its the end of the round give an offer
       }
   }
Challenge Time
Implement all the comments in the else block and you should have a playable game!