play game here.
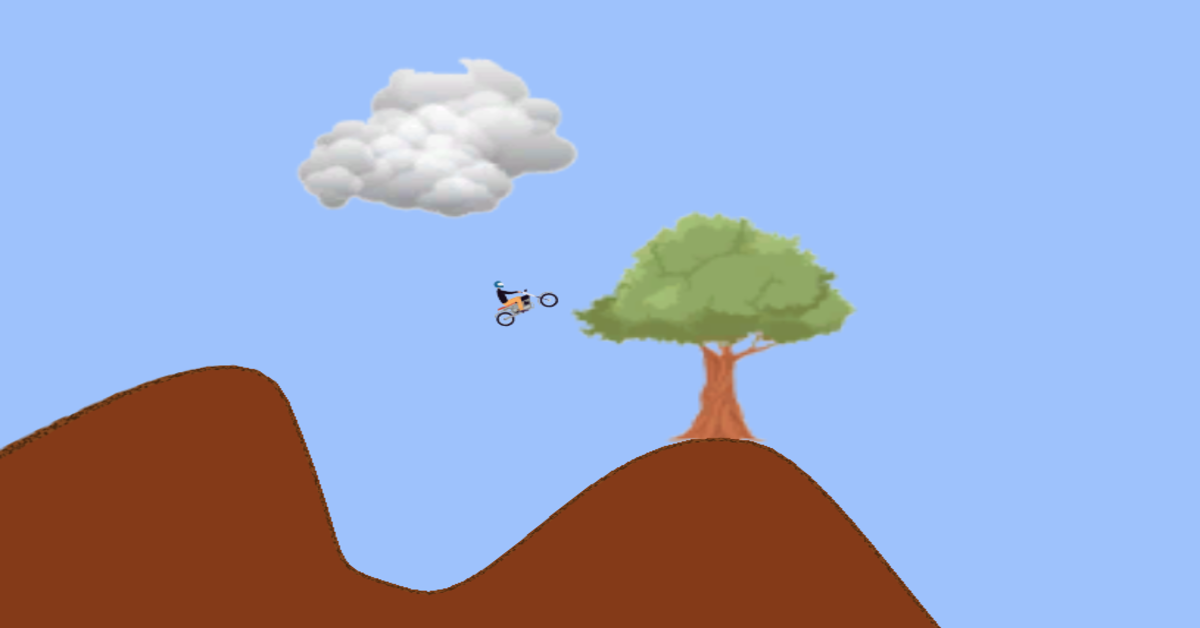
What we will be building
A classic dirt biking game where you will be able to control the rider, it will use a continuous pushing effect, and if you hit your head the player will be forced to restart. There will be jumps to go over. Throughout this process, we will touch on some core Unity features which include the following.
- Sprite Shapes
- Effectors
- Cinemachine
- Particle Effects
- Scene Management
- Adding sound
Game Design
Mechanics
- Move forward
- Control riders spin with left/right
- Add particles to look like dirt shooting from the back tire
- If the riders head is hit restart
- Know when the rider crosses the finish line
Player Experience
- Fun and Relaxing
Game loop
Until the rider passes the finish line, we could make multiple levels and make them increasingly harder but for the purposes of the tutorial, we will just make one medium level.
Prerequisite
If you haven’t already followed this tutorial
- Create a 2D unity project, call it Dirt Biker
- Download and import the game assets into your assets window
Getting Started
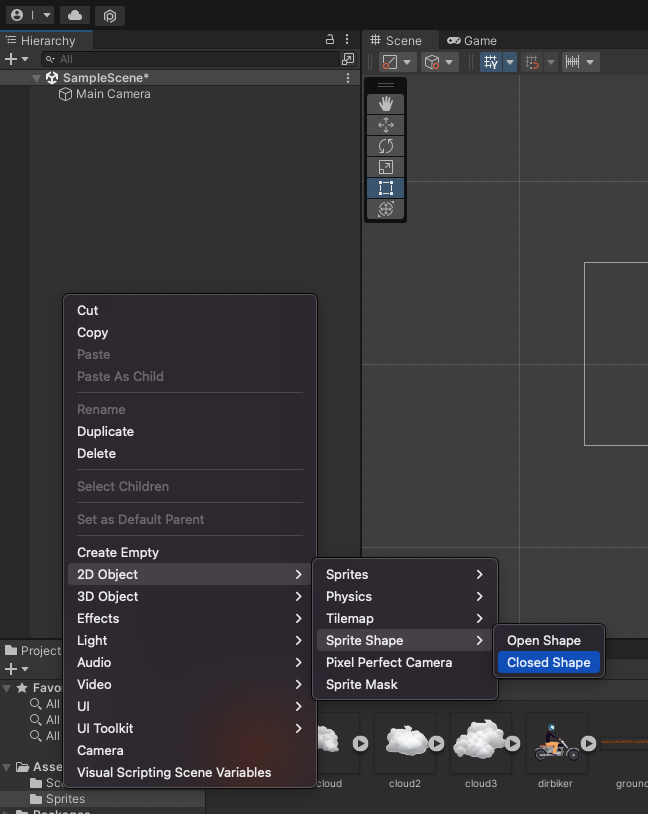
Let’s begin by creating our track. We can do this by working with unity’s sprites and sprite track. In the hierarchy > right click > 2D Object > Sprites Shape > Closed Shape. Rename the newly created object to track.
Inside Assets > Sprites which would come from the file download loaded an imported into assets, add another object by right click Create > 2D > Sprite Shape Profile. Rename this newly created object to track profile.

We will be able to dynamically build out our track now. Select the track object and then in the Inspector > Sprite Shape Controller > Edit Spline.
Notice how there are some dots that become movable in the Scene view. Start clicking around and build out the shape of your dirt bike track.

Great once you have the shape that you want you can add a sprite image to wrap around the sprite profile. Select the track object and then in Inspector > Sprite Shape Controller > Profile, select the track profile you have created.

Then select the track profile from Assets > Sprites > track profile look in the Inspector > Sprites select the ground sprite. Also, set the fill to the brownfill sprite provided. If for some reason you notice a gap between the fill and border you can use the offset to adjust.

Challenge time
Tidy up your game level and add lots of jumps, then post a picture of your level in the comments.

Effectors
Nice, now that we have a map let’s see how we can get the rider to move forward. We could do something similar to our last game where the user needs to press a button down to move forward, but we want them to automatically go forward. This is where effectors come in handy.
First, we need to set up some preliminary work. We should add the following to the rider:
- 2D capsule collider around the tires
- 2D circle collider around the rider’s head
- 2D rigid body, make sure to set the collision detection > continous

Next, we need to add an edge collider to our track. You will be able to see this green outline around the track.

If everything is set up correctly when you hit the play button your rider should hit the track.
Luckily the surface effector does exactly what we want, it acts as a conveyor belt, pulling objects that interact with it along. To use it select the track > Inspector > Add Component > Surface Effector 2D. Play with the speed field to make the rider move faster.

Cinemachine
Looks great so far but it would be nice if our camera followed the rider. We can use Cinemachine to do exactly this. First, we need to install the package to be able to use it as it’s not a default package unity adds to the project. We can add this by going Window > package manager. Make sure to select the unity registry before searching for Cinemachine, by selecting this option it goes to the internet and looks for all available packages. Then click install.

Now that it’s installed we should be able to right click > hierarchy > Cinemachine > Virtual Camera.

Select the virtual camera > Inspector > Follow then from the drop-down select the rider.
Then you can manipulate the camera’s body by opening the game view, it should show this red tint. Mess around with the sliders until you are happy with how the camera follows the player.

Looks good, time to add some controls to our rider. Create a script called RiderControlls and add the functionality to turn the rider so it responds to the left/right arrow keys to turn him.
You might be tempted to do something like
transform.Rotate(0,0,someVar);But this is not going to work as expected because we are dealing with effectors (Physics). We need to meet physics with physics and add torque. You can add torque like this.
using System.Collections;
using System.Collections.Generic;
using UnityEngine;

public class RiderController : MonoBehaviour
{
   float torqueForce = 5;
   Rigidbody2D rb2d;

   void Start(){
       rb2d = GetComponent<Rigidbody2D>();
   }

   // Update is called once per frame
   void Update()
   {
       if(Input.GetKey(KeyCode.LeftArrow)){
           rb2d.AddTorque(torqueForce);
       } else if (Input.GetKey(KeyCode.RightArrow)){
           rb2d.AddTorque(-torqueForce);
       }
   }
}
Now you should be able to control your rider’s orientation with the arrow keys!
Particle Effects
Let’s add some dirt to the tires for a fun. We can use a particles system. Add a particle system to the rider as a child by Hierarchy > right-click > Effects > Particle System, name the system dirt. Then drag the particle system under the rider as shown below.

Mess around with the settings until you get something that looks like this

There’s an issue with this solution tho, the dirt is always shooting. We need to add some code that says only shoot dirt while in contact with the ground. Luckily we have a method called OnCollisionExit2D. Create a new script called dirtTrail.cs and turn the particle system on when the rider is on the ground and turn the system off when they are in the air.
Note: Make sure to attach the script to the rider. I’m also using a SerializedField so make sure to select the dirt system.
using System.Collections;
using System.Collections.Generic;
using UnityEngine;

public class DirtTrail : MonoBehaviour
{
   [SerializeField] ParticleSystem dirt;


   void OnCollisionExit2D(Collision2D other){
       if(other.gameObject.tag == "Ground"){
           dirt.Stop();
       }
   }

   void OnCollisionEnter2D(Collision2D other){
       if(other.gameObject.tag == "Ground"){
           dirt.Play();
       }
   }
}
Nice now the rider only shoots dirt when on the ground.
Scene Management
We almost have a functional game. The next thing that we need is a level restart if we hit our head or cross a finish line. We create levels by using something called scenes, unity comes with a default one which can be viewed Project > Asset > Scenes > SampleScene let’s go ahead and rename the scene to level1. We can also view these from File > Build Settings notice the 0 in the right corner highlighted in blue, that’s the index and will become important soon.

Before we can go any further create a finish line and attach a trigger to it so that we know when the rider crosses it. Also, attach a script that logs out “crossed the line” with a 1-second delay.

using System.Collections;
using System.Collections.Generic;
using UnityEngine;

public class FinishLine : MonoBehaviour
{
   void OnTriggerEnter2D(Collider2D other) {
       if(other.tag == "Rider"){
           Invoke("OnFinish", 1);
       }
   }

   void OnFinish(){
       Debug.Log("Crossed the line.");
   }
}
Great now we can use the SceneManager API to reload our scene when we cross it looks like this.
 void OnFinish(){
       SceneManager.LoadScene(0);
   }
Note: Remember to import the package by using
using UnityEngine.SceneManagement;Challenge Time
Try reloading the Scene when the rider hits their head.
Note: I point out a tag but that’s never used, we use the ground tag.

using System.Collections;
using System.Collections.Generic;
using Unity.VisualScripting;
using UnityEngine;
using UnityEngine.SceneManagement;

public class HeadBonker : MonoBehaviour
{
   void OnCollisionEnter2D(Collision2D other){
       Debug.Log("hit something");
       if(other.gameObject.tag == "Ground"){
           Invoke("OnFinish", 1);
       }
   }

   void OnFinish(){
       SceneManager.LoadScene(0);
   }
}
Adding sound
We want to add a motorbike sound to the rider. In order for us to capture sound, we need three things Audio listener (usually on the camera), an audio source (thing playing the sound), and an audio clip (audio file .mp3). Select the rider > Inspector > Add Component > Audio Source then drag the audio file onto the audio clip.

If you want to make your game more realistic try turning the audio on and off when the rider is on the ground.
This is so neat!